Difference between revisions of "XPicoWiFi/CustomizeWebPages"
| Line 67: | Line 67: | ||
* user_Index | * user_Index | ||
* wlan_profiles_Index | * wlan_profiles_Index | ||
| + | |||
| + | === Adding Tabs === | ||
| + | |||
| + | The Lantronix User Data module makes it easy to add additional tabs with your own data to the existing default pages, without having to redesign all the pages by yourself. To add a new tab, follow these steps: | ||
| + | |||
| + | # Create /user_data directory on the filesystem | ||
| + | # Create /user_data/http directory | ||
| + | # Create /user_data/http/web | ||
| + | # In the web directory, add file called user_data_specification.js | ||
| + | # Go back and create /user_data/http/help directory | ||
| + | # Put config.Custom.html file into the help directory | ||
| + | |||
| + | |||
| + | |||
| + | user_data_specification.js: | ||
| + | <nowiki> | ||
| + | UserData_RegisterTab( | ||
| + | { | ||
| + | name: "Customization", | ||
| + | page: [ | ||
| + | { | ||
| + | group:"Alarms", | ||
| + | item:["Alarm Level","Notify","Severity"], | ||
| + | checkFormValues: function() { | ||
| + | PrintMsg(""); | ||
| + | var a = UserData_GetValue("Alarm Level"); | ||
| + | if(a && ! a.match(/^\d+$/)) { | ||
| + | PrintMsg("ERROR: Alarm Level must be numeric.\r"); | ||
| + | return false; | ||
| + | } | ||
| + | return true; | ||
| + | } | ||
| + | }, | ||
| + | { | ||
| + | group:"Device", | ||
| + | item:["Serial Number","Rank"] | ||
| + | } | ||
| + | ] | ||
| + | } | ||
| + | );</nowiki> | ||
| + | |||
| + | |||
| + | config.Custom.html file: | ||
| + | <nowiki> | ||
| + | <div id="help.config.Custom" style="display:none"> | ||
| + | <p> | ||
| + | The idea is, user custom configuration values are stored under this group. | ||
| + | </p> | ||
| + | </div> | ||
| + | <div id="help.config.Custom.Alarms" style="display:none"> | ||
| + | <p> | ||
| + | The OEM places help for the overall <b>Alarms</b> page here. | ||
| + | </p> | ||
| + | </div> | ||
| + | <div id="help.config.Custom.Alarms.Alarm Level" style="display:none"> | ||
| + | <p> | ||
| + | The OEM describes <b>Alarm Level</b> in detail here. | ||
| + | </p> | ||
| + | </div> | ||
| + | <div id="help.config.Custom.Alarms.Notify" style="display:none"> | ||
| + | <p> | ||
| + | The OEM describes <b>Notify</b> in detail here. | ||
| + | </p> | ||
| + | </div> | ||
| + | <div id="help.config.Custom.Alarms.Severity" style="display:none"> | ||
| + | <p> | ||
| + | The OEM describes <b>Severity</b> in detail here. | ||
| + | </p> | ||
| + | </div> | ||
| + | <div id="help.config.Custom.Device" style="display:none"> | ||
| + | <p> | ||
| + | The OEM places help for the overall <b>Device</b> page here. | ||
| + | </p> | ||
| + | </div> | ||
| + | <div id="help.config.Custom.Device.Serial Number" style="display:none"> | ||
| + | <p> | ||
| + | The OEM describes <b>Serial Number</b> in detail here. | ||
| + | </p> | ||
| + | </div> | ||
| + | <div id="help.config.Custom.Device.Rank" style="display:none"> | ||
| + | <p> | ||
| + | The OEM describes <b>Rank</b> in detail here. | ||
| + | </p> | ||
| + | </div></nowiki> | ||
Revision as of 18:21, 25 August 2015
Contents
Introduction
A very common use case for the xPico Wi-Fi is to customize the web pages that are served by the web server that is integrated into the xPico Wi-Fi. There are multiple ways to achieve this, so you need to think about how you want it to look.
You can use the existing Lantronix pages and remove certain items while also adding your own items, or you can create your own completely custom pages that don't use the Lantronix HTML/Javascript content at all.
This document shows how to get started with doing both.
Using the Lantronix pages
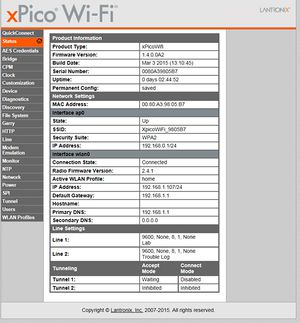
Default Web Manager
This is what by default the Lantronix Web Manager looks like:
Overriding files
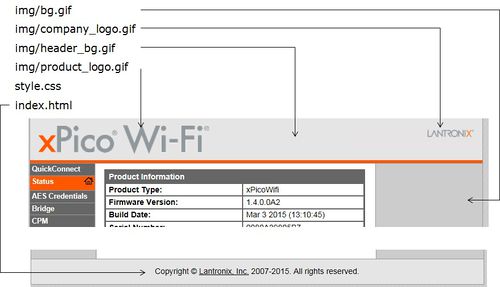
The HTML, Javascript, and CSS that makes the default Lantronix web pages is built into the Lantronix firmware. These are called Overridable files, in that you can create your own to be served instead of the default ones. The list of overridable files is in the "Branding the xPico Wi-Fi Unit" chapter of the xPico Wi-Fi User Guide. The overridable files are:
- index.html – Main file controlling text and graphics
- style.css – Style sheet
- img/bg.gif – Main background
- img/company_logo.gif – Company logo in header container
- img/product_logo.gif – Product logo in header container
- img/favicon.ico – Shortcut icon
- img/header_bg.gif – Head container background
If you would like to override a file, place it in the following directory in the filesystem: /main/http/web_manager
You can create the override file from scratch, or you can save as source the Lantronix one and modify it. If you would like to see the source of the Lantronix default page, you can find it in the following directory: /embedded/main/http/web_manager
The following picture shows the effect of the different overridable files:
Removing tabs
If you would like to remove tabs from the left-hand side menu, you can do so by overriding the style.css file with your own which hides the different menus. Copy the default style.css file and set any menus you want to hide to the display:none; style. For example, to hide the tab for SPI, the style.css file would have:
#spi_Index
{
	display: none;
}
The list of IDs used for each tab is:
- quickconnect_Index
- status_Index
- aes_credentials_Index
- bridge_Index
- cpm_Index
- clock_Index
- device_Index
- diagnostics_Index
- discovery_Index
- filesystem_Index
- httpserver_Index
- line_Index
- modem_emulation_Index
- monitor_Index
- ntp_Index
- network_Index
- performance_Index
- spi_Index
- tunnel_Index
- user_Index
- wlan_profiles_Index
Adding Tabs
The Lantronix User Data module makes it easy to add additional tabs with your own data to the existing default pages, without having to redesign all the pages by yourself. To add a new tab, follow these steps:
- Create /user_data directory on the filesystem
- Create /user_data/http directory
- Create /user_data/http/web
- In the web directory, add file called user_data_specification.js
- Go back and create /user_data/http/help directory
- Put config.Custom.html file into the help directory
user_data_specification.js:
UserData_RegisterTab(
    {
        name: "Customization",
        page: [
            {
                group:"Alarms",
                item:["Alarm Level","Notify","Severity"],
                checkFormValues: function() {
                    PrintMsg("");
                    var a = UserData_GetValue("Alarm Level");
                    if(a && ! a.match(/^\d+$/)) {
                        PrintMsg("ERROR: Alarm Level must be numeric.\r");
                        return false;
                    }
                    return true;
                }
            },
            {
                group:"Device",
                item:["Serial Number","Rank"]
            }
        ]
    }
);
config.Custom.html file:
<div id="help.config.Custom" style="display:none">
    <p>
        The idea is, user custom configuration values are stored under this group.
    </p>
</div>
<div id="help.config.Custom.Alarms" style="display:none">
    <p>
        The OEM places help for the overall <b>Alarms</b> page here.
    </p>
</div>
<div id="help.config.Custom.Alarms.Alarm Level" style="display:none">
    <p>
        The OEM describes <b>Alarm Level</b> in detail here.
    </p>
</div>
<div id="help.config.Custom.Alarms.Notify" style="display:none">
    <p>
        The OEM describes <b>Notify</b> in detail here.
    </p>
</div>
<div id="help.config.Custom.Alarms.Severity" style="display:none">
    <p>
        The OEM describes <b>Severity</b> in detail here.
    </p>
</div>
<div id="help.config.Custom.Device" style="display:none">
    <p>
        The OEM places help for the overall <b>Device</b> page here.
    </p>
</div>
<div id="help.config.Custom.Device.Serial Number" style="display:none">
    <p>
        The OEM describes <b>Serial Number</b> in detail here.
    </p>
</div>
<div id="help.config.Custom.Device.Rank" style="display:none">
    <p>
        The OEM describes <b>Rank</b> in detail here.
    </p>
</div>

