Difference between revisions of "XPicoWiFi/SDK/Introduction"
| (14 intermediate revisions by the same user not shown) | |||
| Line 1: | Line 1: | ||
| + | {{HideTitle}} | ||
== Introduction == | == Introduction == | ||
| + | |||
| + | You can download the SDK installer at [http://www.lantronix.com/xpico-wi-fi-sdk-download/ this link]. The currently released SDK is version 1.4.0.0R28. | ||
| + | |||
| + | You can also find Alpha (version 1.5) SDK installers in the forums: | ||
| + | http://forums.lantronix.com/forumdisplay.php?f=51 | ||
| + | |||
| + | Version 1.5 has many new features as well as bug fixes. | ||
The xPico Wi-Fi SDK lets you run your custom programs in the microcontroller that's part of the module. The SDK is organized in a modular fashion, so that you can use all of the Lantronix programs, and just add what you need, without having to re-write all of the networking and configuration utilities that are part of the Lantronix SmartSuite software offering. | The xPico Wi-Fi SDK lets you run your custom programs in the microcontroller that's part of the module. The SDK is organized in a modular fashion, so that you can use all of the Lantronix programs, and just add what you need, without having to re-write all of the networking and configuration utilities that are part of the Lantronix SmartSuite software offering. | ||
| Line 9: | Line 17: | ||
Double-click on the setup executable, and follow the prompts. The installer will create two directories on your computer: | Double-click on the setup executable, and follow the prompts. The installer will create two directories on your computer: | ||
| − | C:\MinGW | + | * C:\MinGW |
| − | + | ** An Open Source programming tool that provides the GNU Compiler Collection (GCC) in a Windows environment. | |
| − | C:\xPicoWifi | + | * C:\xPicoWifi |
| + | ** All the SDK related content resides here | ||
== Projects and Modules == | == Projects and Modules == | ||
| Line 48: | Line 57: | ||
== Getting Started == | == Getting Started == | ||
| − | Navigate to C:\xPicoWifi and double-click on the MinGW-shell shortcut | + | Navigate to C:\xPicoWifi and double-click on the MinGW-shell shortcut. |
| + | |||
| + | [[File:mingw.jpg|500px]] | ||
| + | |||
| + | This will open the MinGW shell. | ||
In that shell, enter: | In that shell, enter: | ||
| Line 54: | Line 67: | ||
cd /c/xPicoWifi/custom/project/helloDemo | cd /c/xPicoWifi/custom/project/helloDemo | ||
make</nowiki> | make</nowiki> | ||
| + | |||
| + | [[File:Initialmingw.jpg|500px]] | ||
This will build the Hello World module and main module. The Hello World module registers a Line module that writes Hello World on that Line. | This will build the Hello World module and main module. The Hello World module registers a Line module that writes Hello World on that Line. | ||
| − | The output of the build will be in the C:\xPicoWifi\work\helloDemo directory. | + | The output of the build will be in the C:\xPicoWifi\work\helloDemo directory. |
| + | |||
| + | [[File:Rombuilt.png|500px]] | ||
| + | |||
| + | Since the process of building a Project creates a complete firmware image for the xPico Wi-Fi, use the standard update firmware process to put this image on your xPico Wi-Fi. | ||
| − | If you look at hello_world.c in the Module, you will see that hello_world_module_initialization registers a Line Protocol (calls ltrx_line_register_protocol). This means that when you load the firmware, the only thing the code does is tell the xPico Wi-Fi system that a new Line Protocol is available for use. | + | If you look at hello_world.c in the Module (at c:\xPicoWifi\custom\module\hello_world\), you will see that hello_world_module_initialization registers a Line Protocol (calls ltrx_line_register_protocol). This means that when you load the firmware, the only thing the code does is tell the xPico Wi-Fi system that a new Line Protocol is available for use. |
To actually start sending "Hello World" to the serial port every 2 seconds, you need to configure one of the Lines to the Hello World protocol: | To actually start sending "Hello World" to the serial port every 2 seconds, you need to configure one of the Lines to the Hello World protocol: | ||
[[File:HelloWorld.png|500px]] | [[File:HelloWorld.png|500px]] | ||
| + | |||
| + | == Documentation == | ||
| + | |||
| + | The canonical documentation for the SDK is part of your installation. You can open the browser-based documentation by double-clicking on the <code>C:\xPicoWifi\documentation\theDocument.bat</code> file. | ||
| + | |||
| + | [[File:documentation.png|500px]] | ||
| + | |||
| + | From here you can navigate to read about all the APIs, Data Structures, and Files that are available to you as the developer. | ||
| + | |||
| + | == Demos == | ||
| + | |||
| + | The SDK comes with a number of demos so that you can get started. Some of the demo projects are: | ||
| + | |||
| + | * configurablePinDemo: Use the GPIOs | ||
| + | * customDataDemo: Access custom configurables, from the User Data defined configurable items | ||
| + | * echoDemo: Echo data on the UART | ||
| + | * helloDemo: Output "Hello World" on a UART | ||
| + | * powerDownDemo: Demonstrate the use of power management | ||
| + | * programmaticScanDemo: Scan for Wi-Fi networks | ||
| + | * spiLogDemo: Use the SPI Master interface | ||
| + | * tcpTunnelDemo: Create your own Line protocol with data sent via TCP | ||
| + | * udpTunnelDemo: Create your own Line protocol with data sent via UDP | ||
| + | * xmlAccessDemo: See how to access configuration and status via XML | ||
| + | |||
| + | == Forums == | ||
| + | |||
| + | The Lantronix Forums are available to ask any questions you have on customizing your xPico Wi-Fi using the SDK. You can access the forum directly [http://forums.lantronix.com/forumdisplay.php?f=51 here] | ||
Latest revision as of 11:08, 24 April 2017
<css> h1.firstHeading { display:none; } </css>
Contents
Introduction
You can download the SDK installer at this link. The currently released SDK is version 1.4.0.0R28.
You can also find Alpha (version 1.5) SDK installers in the forums: http://forums.lantronix.com/forumdisplay.php?f=51
Version 1.5 has many new features as well as bug fixes.
The xPico Wi-Fi SDK lets you run your custom programs in the microcontroller that's part of the module. The SDK is organized in a modular fashion, so that you can use all of the Lantronix programs, and just add what you need, without having to re-write all of the networking and configuration utilities that are part of the Lantronix SmartSuite software offering.
Installation
The xPico Wi-Fi SDK is to be used in the Microsoft Windows operating system.
Double-click on the setup executable, and follow the prompts. The installer will create two directories on your computer:
- C:\MinGW
- An Open Source programming tool that provides the GNU Compiler Collection (GCC) in a Windows environment.
- C:\xPicoWifi
- All the SDK related content resides here
Projects and Modules
To understand the organization of the SDK, it is critical that you understand two concepts: Projects and Modules.
Projects
The end result of a project is a .rom file which can be flashed into an xPico Wi-Fi. This is where you will determine which modules you will use. Modules can be either the ones written by Lantronix, or the custom modules that you create.
Projects are in the following directory:
c:\xPicoWifi\custom\project\
You can edit Makefile to change the SDK_VERSION which will be incorporated in the firmware version of the resulting image.
The modules.make file tells the compiler which modules to include in the final build.
Modules
These are the building blocks of the firmware image, and where you will be spending the most time. There are a number of Lantronix-provided modules that you can include in your Project. This means that your code only needs to take care of what you need to customize, and you don't need to re-create network configuration and management utilities.
The Lantronix provided modules are:
- aes: AES encryption/decryption
- bridge: USB to Wi-Fi bridging
- discovery: Lantronix discovery protocol
- main: Required for the main Lantronix software
- modem_emulation: UART Protocol: AT command set
- monitor: UART/SPI Protocol: Monitor scripting and Explorer configuration
- mux: UART Protocol: Serial API for multiplexing network connections onto single serial port
- ntp: Simple NTP Client (Network Time Protocol)
- rndis: Ethernet over USB module (used with bridge)
- tunnel: UART Protocol: Can be used to tunnel data to network
- user_data: Framework for adding your own tabs to the Lantronix Web Manager page
Getting Started
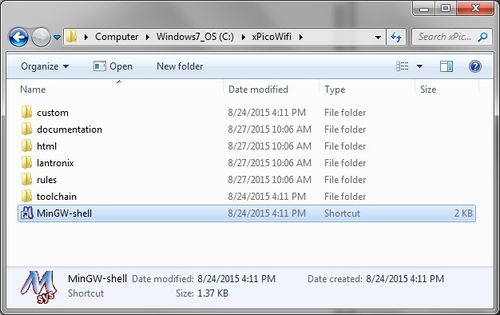
Navigate to C:\xPicoWifi and double-click on the MinGW-shell shortcut.
This will open the MinGW shell.
In that shell, enter:
cd /c/xPicoWifi/custom/project/helloDemo
make
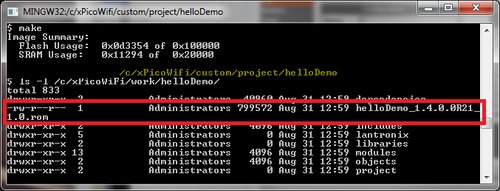
This will build the Hello World module and main module. The Hello World module registers a Line module that writes Hello World on that Line.
The output of the build will be in the C:\xPicoWifi\work\helloDemo directory.
Since the process of building a Project creates a complete firmware image for the xPico Wi-Fi, use the standard update firmware process to put this image on your xPico Wi-Fi.
If you look at hello_world.c in the Module (at c:\xPicoWifi\custom\module\hello_world\), you will see that hello_world_module_initialization registers a Line Protocol (calls ltrx_line_register_protocol). This means that when you load the firmware, the only thing the code does is tell the xPico Wi-Fi system that a new Line Protocol is available for use.
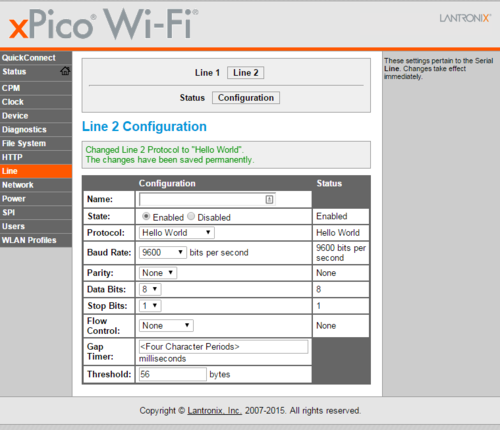
To actually start sending "Hello World" to the serial port every 2 seconds, you need to configure one of the Lines to the Hello World protocol:
Documentation
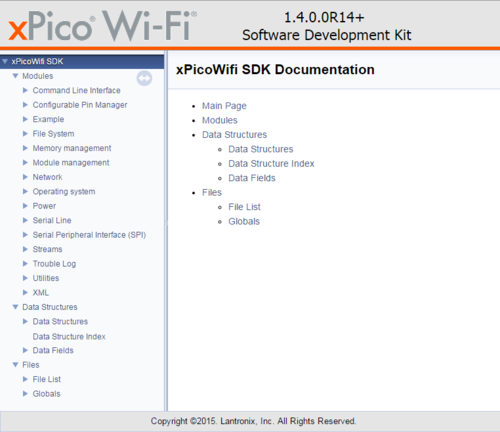
The canonical documentation for the SDK is part of your installation. You can open the browser-based documentation by double-clicking on the C:\xPicoWifi\documentation\theDocument.bat file.
From here you can navigate to read about all the APIs, Data Structures, and Files that are available to you as the developer.
Demos
The SDK comes with a number of demos so that you can get started. Some of the demo projects are:
- configurablePinDemo: Use the GPIOs
- customDataDemo: Access custom configurables, from the User Data defined configurable items
- echoDemo: Echo data on the UART
- helloDemo: Output "Hello World" on a UART
- powerDownDemo: Demonstrate the use of power management
- programmaticScanDemo: Scan for Wi-Fi networks
- spiLogDemo: Use the SPI Master interface
- tcpTunnelDemo: Create your own Line protocol with data sent via TCP
- udpTunnelDemo: Create your own Line protocol with data sent via UDP
- xmlAccessDemo: See how to access configuration and status via XML
Forums
The Lantronix Forums are available to ask any questions you have on customizing your xPico Wi-Fi using the SDK. You can access the forum directly here


