Difference between revisions of "XPicoWiFi/WebAPItoDevice"
| (6 intermediate revisions by the same user not shown) | |||
| Line 1: | Line 1: | ||
| − | '''This | + | '''This requires 1.4 firmware. Released version is 1.4.0.0R28''' |
| Line 17: | Line 17: | ||
'''Important configuration:''' To use the Web to Serial function, the Line configuration must be set to None so that there is no conflict with other serial applications (like Mux or Monitor, for example). | '''Important configuration:''' To use the Web to Serial function, the Line configuration must be set to None so that there is no conflict with other serial applications (like Mux or Monitor, for example). | ||
| − | === Sending Data === | + | === Sending Data to Serial Port === |
To send data to one of the serial ports, the WebAPI call needs to include the following key/value pairs: | To send data to one of the serial ports, the WebAPI call needs to include the following key/value pairs: | ||
| Line 31: | Line 31: | ||
xmlhttp.open("POST", "/action/status", true); | xmlhttp.open("POST", "/action/status", true); | ||
xmlhttp.setRequestHeader("Content-Type", "application/x-www-form-urlencoded"); | xmlhttp.setRequestHeader("Content-Type", "application/x-www-form-urlencoded"); | ||
| − | xmlhttp.send("group=Line&optionalGroupInstance=1&optionalItem=Transmitter&action=Hex Transmit 48656C6C6F20776F726C640A"); | + | xmlhttp.send("group=Line&optionalGroupInstance=1&optionalItem=Transmitter&action=Hex Transmit 48656C6C6F20776F726C640A");</nowiki> |
| − | </nowiki> | + | |
| + | === Receiving Data from Serial Port === | ||
| + | |||
| + | To read data from one of the serial ports, the WebAPI call needs to include the following key/value pairs: | ||
| + | * group: "Line" | ||
| + | * optionaGroupInstance: "1" or "2" | ||
| + | * optionalItem: "Receiver" | ||
| + | * action: "Receive" or "Hex Receive" | ||
| + | |||
| + | For example to read data from Line 1 using Javascript, you would use this code: | ||
| + | |||
| + | <nowiki> | ||
| + | var xmlhttp=new XMLHttpRequest(); | ||
| + | xmlhttp.open("POST", "/action/status", true); | ||
| + | xmlhttp.setRequestHeader("Content-Type", "application/x-www-form-urlencoded"); | ||
| + | xmlhttp.send("group=Line&optionalGroupInstance=1&optionalItem=Receiver&action=Hex Receive");</nowiki> | ||
| + | |||
| + | The response will be in XML, with the data read from the serial port inside the <code><message></code> tag. For example reading "Hello world" will return this: | ||
| + | |||
| + | <nowiki> | ||
| + | <?xml version="1.0" standalone="yes"?> | ||
| + | <!-- Automatically generated XML --> | ||
| + | <!DOCTYPE function [ | ||
| + | |||
| + | <!ELEMENT function (return)> | ||
| + | <!ELEMENT return (result,message+)> | ||
| + | <!ELEMENT result (#PCDATA)> | ||
| + | <!ELEMENT message (#PCDATA)> | ||
| + | <!ATTLIST function version CDATA #IMPLIED> | ||
| + | ]> | ||
| + | <function version = "0.1.0.0"> | ||
| + | <return> | ||
| + | <message>48 65 6c 6c 6f 20 77 6f 72 6c 64 0d </message> | ||
| + | <result>Succeeded</result> | ||
| + | </return> | ||
| + | </function></nowiki> | ||
| + | |||
| + | === Sending and receiving in one transaction === | ||
| + | |||
| + | Sometimes it is useful to both send data and receive data in one transaction, so that you don't have an issue with multiple clients trying to access data at the same time. To do this, the WebAPI call needs to include the following key/value pairs: | ||
| + | * group: "Line" | ||
| + | * optionaGroupInstance: "1" or "2" | ||
| + | * action: "Command <value>" | ||
| + | |||
| + | Syntax of <value> is: | ||
| + | [n=<decimal number> ][m=<decimal number> ][t=<hex number> ]<hex bytes to send> | ||
| + | |||
| + | Where: | ||
| + | * n is maximum characters to read; default is unlimited | ||
| + | * m is milliseconds total time limit; default is 1000 | ||
| + | * t is terminating byte; default is <None> | ||
| + | |||
| + | Note that this function always sends and receives Hex values. | ||
| + | |||
| + | For example, to send "Hello world" to Line 1, then wait for response100ms or up to 20 characters or until a newline character, the Javascript code is: | ||
| + | <nowiki> | ||
| + | var xmlhttp=new XMLHttpRequest(); | ||
| + | xmlhttp.open("POST", "/action/status", true); | ||
| + | xmlhttp.setRequestHeader("Content-Type", "application/x-www-form-urlencoded"); | ||
| + | xmlhttp.send("group=Line&optionalGroupInstance=1&action=Command m=100 n=20 t=0A 48656C6C6F20776F726C640A");</nowiki> | ||
== Javascript Library == | == Javascript Library == | ||
| Line 47: | Line 106: | ||
==== serialReceive ==== | ==== serialReceive ==== | ||
Receive ASCII data from one of the serial ports. | Receive ASCII data from one of the serial ports. | ||
| + | |||
| + | ==== serialTransact ==== | ||
| + | Send and receive ASCII data from one of the serial ports in a single HTTP transaction. | ||
==== getLineConfig ==== | ==== getLineConfig ==== | ||
Latest revision as of 14:57, 1 July 2016
This requires 1.4 firmware. Released version is 1.4.0.0R28
Overview
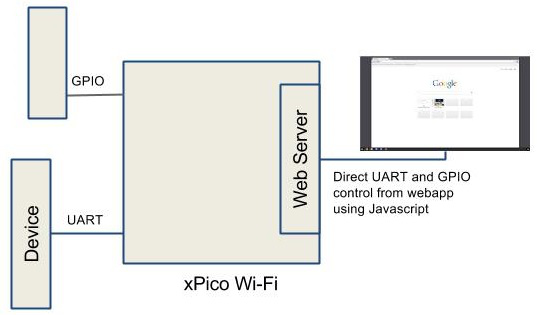
The xPico Wi-Fi's web server has a function called WebAPI that allows you to monitor and control the xPico Wi-Fi and attached devices via HTTP calls to specific URLs. For example, the /export/config URL lets you view the current configuration of the xPico Wi-fi. The /export/status lets you view the current status, such as Wi-Fi signal strength, IP addresses, etc.
For the Web to Serial feature, the relevant URL is /action/status. This lets you directly send and receive data from the serial ports, as well as manipulate the GPIOs (CP) with an HTTP transaction, for example from Javascript.
WebAPI Status Actions
By using the WebAPI, you can use HTTP transactions (for example from Javascript) to Transmit and Receive data to the two serial ports, as well as to change and monitor the status of the CPs of the xPico Wi-fi. The data is sent urlencoded, and the response is in the XML format. For more details on how to use the WebAPI, please see Chapter 5 of the User Guide.
Important configuration: To use the Web to Serial function, the Line configuration must be set to None so that there is no conflict with other serial applications (like Mux or Monitor, for example).
Sending Data to Serial Port
To send data to one of the serial ports, the WebAPI call needs to include the following key/value pairs:
- group: "Line"
- optionaGroupInstance: "1" or "2"
- optionalItem: "Transmitter"
- action: "Transmit <value>" or "Hex Transmit <value>"
For example to send data to Line 1 using Javascript, you would use this code:
var xmlhttp=new XMLHttpRequest();
xmlhttp.open("POST", "/action/status", true);
xmlhttp.setRequestHeader("Content-Type", "application/x-www-form-urlencoded");
xmlhttp.send("group=Line&optionalGroupInstance=1&optionalItem=Transmitter&action=Hex Transmit 48656C6C6F20776F726C640A");
Receiving Data from Serial Port
To read data from one of the serial ports, the WebAPI call needs to include the following key/value pairs:
- group: "Line"
- optionaGroupInstance: "1" or "2"
- optionalItem: "Receiver"
- action: "Receive" or "Hex Receive"
For example to read data from Line 1 using Javascript, you would use this code:
var xmlhttp=new XMLHttpRequest();
xmlhttp.open("POST", "/action/status", true);
xmlhttp.setRequestHeader("Content-Type", "application/x-www-form-urlencoded");
xmlhttp.send("group=Line&optionalGroupInstance=1&optionalItem=Receiver&action=Hex Receive");
The response will be in XML, with the data read from the serial port inside the <message> tag. For example reading "Hello world" will return this:
<?xml version="1.0" standalone="yes"?>
<!-- Automatically generated XML -->
<!DOCTYPE function [

<!ELEMENT function (return)>
<!ELEMENT return (result,message+)>
<!ELEMENT result (#PCDATA)>
<!ELEMENT message (#PCDATA)>
<!ATTLIST function version CDATA #IMPLIED>
]>
<function version = "0.1.0.0">
    <return>
        <message>48 65 6c 6c 6f 20 77 6f 72 6c 64 0d </message>
        <result>Succeeded</result>
    </return>
</function>
Sending and receiving in one transaction
Sometimes it is useful to both send data and receive data in one transaction, so that you don't have an issue with multiple clients trying to access data at the same time. To do this, the WebAPI call needs to include the following key/value pairs:
- group: "Line"
- optionaGroupInstance: "1" or "2"
- action: "Command <value>"
Syntax of <value> is: [n=<decimal number> ][m=<decimal number> ][t=<hex number> ]<hex bytes to send>
Where:
- n is maximum characters to read; default is unlimited
- m is milliseconds total time limit; default is 1000
- t is terminating byte; default is <None>
Note that this function always sends and receives Hex values.
For example, to send "Hello world" to Line 1, then wait for response100ms or up to 20 characters or until a newline character, the Javascript code is:
var xmlhttp=new XMLHttpRequest();
xmlhttp.open("POST", "/action/status", true);
xmlhttp.setRequestHeader("Content-Type", "application/x-www-form-urlencoded");
xmlhttp.send("group=Line&optionalGroupInstance=1&action=Command m=100 n=20 t=0A 48656C6C6F20776F726C640A");
Javascript Library
While the WebAPI can be used to affect configuration with simple HTTP transactions like a form submission, or from a smartphone App like the Lantronix xPico Wi-Fi Utilities Android App, one of the most common uses is to create a webapp that is stored in the xPico Wi-Fi's filesystem and served by the local web server. In that fashion, using Javascript, you can create a dynamic webapp to access the hardware in your end product easily.
xpwJslib on Github
To make it easy for you to deploy rich, dynamic webapps on the xPico Wi-Fi, Lantronix has made available a Javascript library to make it easy to use the WebAPI to conduct status Actions and send data back and forth to the serial port. You can find the library, with documentation on all of the functions on Github.
serialTransmit
Transmit ASCII data to one of the serial ports.
serialReceive
Receive ASCII data from one of the serial ports.
serialTransact
Send and receive ASCII data from one of the serial ports in a single HTTP transaction.
getLineConfig
Get a Javascript object with the configuration of a serial port, the library decodes the XML for you.
setLineConfig
Easily change serial port configuration with a Javascript object, the library builds the XML for you.
getGpioStatus
Receive the status of all the Configurable Pins
setGpio
Set a Configurable Pin as input, output, high, or low
Available examples
serial.html
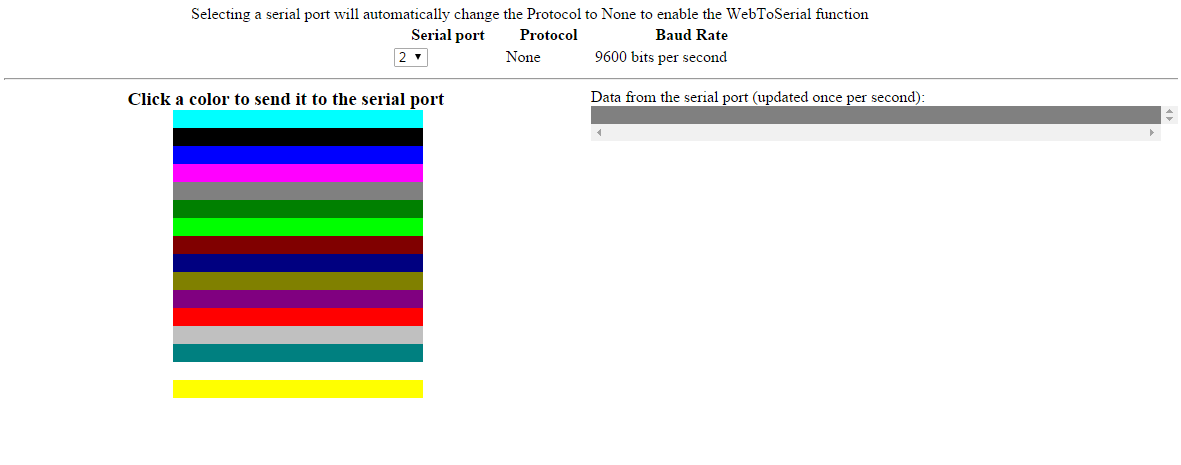
This example automatically queries the configuration (getLineConfig) of the selected serial port. If it's not set to None, it then uses setLineConfig to set the Protocol of the serial port to None, so that it can be used for the Web to Serial feature. Once configured, it allows you to click on a color on the screen and using AJAX it uses serialTransmit to send the name of the color out to the serial port. It also periodically checks the serial port for incoming data, and displays it on the web page.
gpio.html
This example reads the status of the Configurable Pins and allows you to change the status.

