PremierWave/Timesys Programmers Guide
Contents
Introduction
Overview
This guide introduces developers to the support for customizing the Linux system on the Lantronix line of embedded and ready-to-deploy Intelligent Gateway products. It describes how to compile, load, and run custom programs on Lantronix devices, modify the Linux kernel to load custom drivers, and create images to deploy to your device.
Supported Lantronix Products
The following Lantronix products can be customized using the Linux Timesys development environment.
Documentation
The full documentation on how to use the development tools are available from Timesys. The guide below is an example workflow to quickly get started.
This will give you a bootstrap for a project. This example uses the LinuxLink Cloud build that comes with the Timesys free tools. Timesys also offers commercial support, professional services, training, and tools such as desktop factory and Timestorm IDE that can make development easier. For more information on that, you can contact Timesys.
Getting Started
Setup a Linux host
To compile custom programs and create the image for the PremierWave devices, you will need a computer running Linux. You can setup a computer to boot into Linux, or use a virtual environment such as VMWare Player or VirtualBox to run the Linux operating system as a Guest Operating System. Lantronix has tested recent versions of the Ubuntu Linux distribution.
Sign into Timesys and create your first image
Sign up for Timesys LinuxLink account [1]
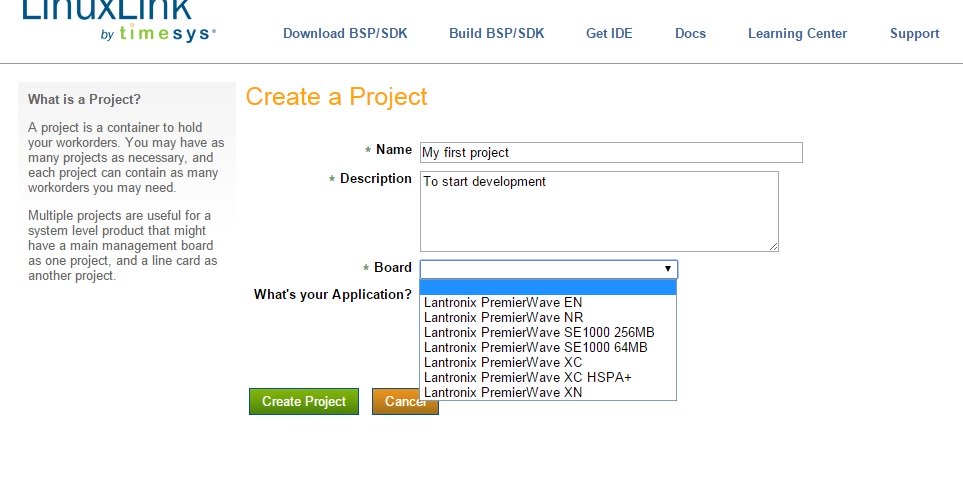
Click on Build BSP/SDK and then Create a Project. Give your project a name, select your PremierWave product as the Board, and click on Create Project.
Then click on Create a Workorder, give it a name, and click Next. Click next when it asks for for kernel and Toolchain. This will keep the default versions of the kernel and libc.
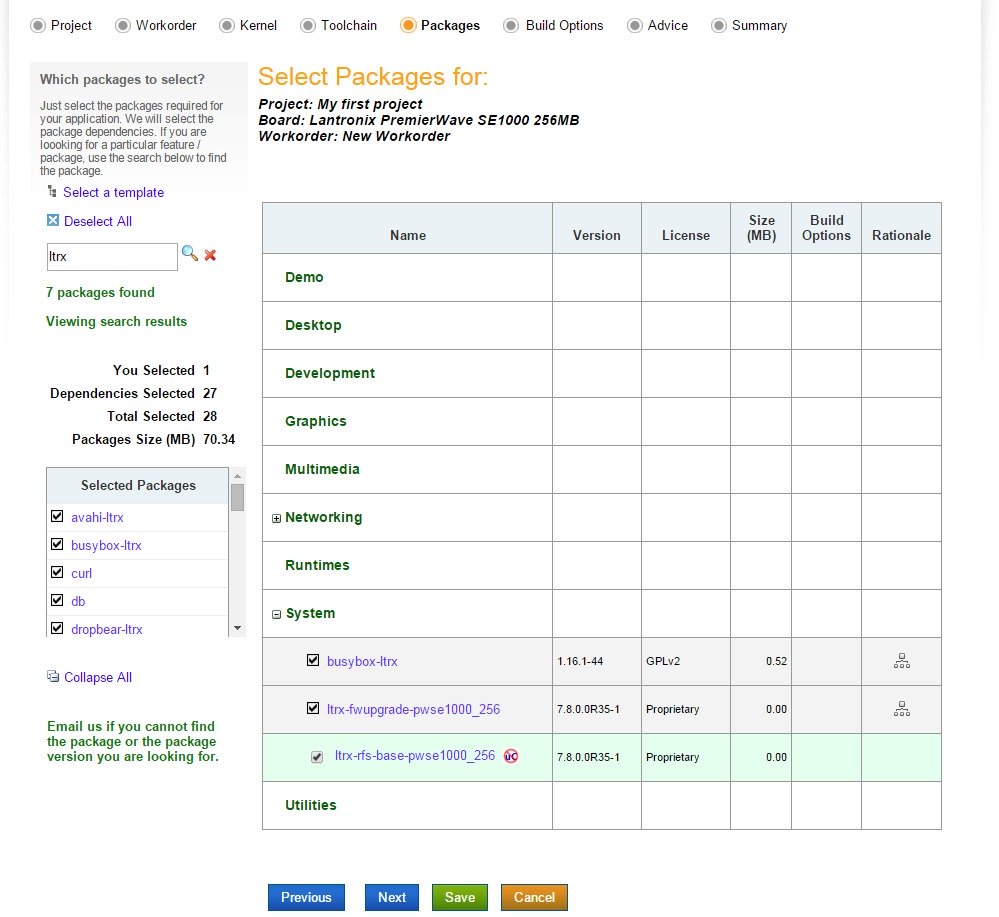
On the packages page, expand System and select ltrx-rfs-base and ltrx-fwupgrade. At this point you can also select any other packages that you would like the LinuxLink system to build in for you. Then click Next. See the image below.
Leave the defaults for the rest of the screens (click Next), then click Build in the last screen to start the build process.
You will eventually get an email that the build process has finished. At that time, you will be able to setup the SDK.
Setup SDK
In your Linux Host, click the link on the email or go back to the Timesys LinuxLink page and click on Download BSP/SDK. Select your project, and then click on the link called Download SDK installer. This will download a file named premierwave_xxxxx.sh which is an executable shell script.
To install the SDK, you will need to execute this image by following these steps from a terminal window:
chmod +x premierwave_xxxxxx.sh
./premierwave_xxxxxxx.sh
Follow the instructions on the screen to install the SDK onto your Linux host. If you left the defaults, the SDK will be installed in the ~/timesys/premierwave_xxxxx directory. Add toolchain/bin to the $PATH variable (for example, in your ~/.profile file), and add the environment variable CC=armv5l-timesys-linux-gnueabi-gcc
Exploring the SDK
The directory structure of the SDK looks as follows:
- bootloader/
This directory includes the premierwave-xxxxx.rom image, which can be directly programmed into your PremierWave device. This image includes the packages that were chosen in the Timesys web build. It also includes the u-boot binary image for the bootloader.
- toolchain/
This directory includes the binary cross-compilers to be able to compile your custom programs into the ARM processor of the PremierWave device. It also includes the libraries and include files necessary to make the compilation.
- kernel_source/
This directory is where the source code for the Linux kernel lives. Modifications to the kernel can be done here, and will be explained later.
- rfs/
The root filesystem of the PremierWave device in multiple formats. There is a rootfs.tar.gz file which can be expanded to see all the files that will be installed on the device, as well as the filesystem in UBI format, and in ROM format to be added to the PremierWave device.
Programming the new firmware
The next step is to take the .rom image from the bootloader/ directory and load it into the PremierWave device as the new firmware. This can be done via the web manager of the PremierWave or with DeviceInstaller via the serial port.
Using the web manager
Programming via the web manager is preferred as it is much faster. The limitation of this approach is that the size of the filesystem on the PremierWave device cannot be resized. So if the firmware image that was built contains large packages that increased the size of the filesystem beyond the existing partitions, you will need to use DeviceInstaller.
Follow the instructions on the User Guide of the PremierWave device for uploading new firmware.
Using DeviceInstaller
Turn power off to the PremierWave device, and connect a serial port on your PremierWave device to a serial port on your PC.
- Click Tools->Recover Firmware (or press F8)
- Select the COM port on your PC, and the Device Model for your PremierWave device
- Make sure the "Erase All Flash" checkbox is checked. This is necessary to resize the flash partitions
- Browse to the firmware .rom file and select it
- Click OK
Using the cross-compiler to create applications
Please refer to the Timesys documentation for how to create applications using the Timestorm IDE. To use the cross-compilers manually, see Demo 1 in this Application Note. You can also download the example source code.
Creating a custom firmware image
Image contents
The firmware image that gets loaded into the PremierWave device normally consists of two parts: kernel and root filesystem (rootfs)
You can inspect any ROM file to see what the contents are with this command:
ltrx-makeimage -d file.rom
Combine parts to create the image
Using the Timesys SDK you can modify both the kernel and the filesystem, and then create a custom image with your customized pieces. The command is:
ltrx-makeimage -c <kernel rom> <rootfs rom> <output rom>
The default kernel ROM file is ~/timesys/premierwave/uImage.rom-2.6.30-ts-armv5l
Modifying the filesystem
It will normally be desirable to put your custom applications into the root filesystem so that they are automatically deployed into PremierWave devices when you program your custom firmware image. You will probably also want to make changes to files in the /etc directory, such as the password file to remove root access from production devices, and the inittab file to automatically start your applications upon boot.
Flash partitioning
The nand flash of the PremierWave devices is partitioned into these partitions:
| Partition List | ||
|---|---|---|
| Name | Mount Point | Purpose |
| rootfs_1 | / | Bank 1 filesystem |
| rootfs_2 | / | Bank 2 filesystem |
| ltrx_private | /ltrx_private | Configuration files |
| ltrx_public | /ltrx_public | User space filesystem |
By default the PremierWave devices use a dual-bank rootfs so that you can do fail-safe updates over the network. When programming a new image from DeviceInstaller (after erasing all flash), 2 rootfs partitions will be created to match the indicated size on the image, then the ltrx_private will use approximately 2 MB, and the ltrx_public partition will use the rest of the nand flash.
Create custom filesystem
These steps will be done on your Linux host or virtual machine image which has the Timesys SDK installed.
- Create a directory to work in, for example ~/projects/fs and change to it
Extract the filesystem that you downloaded from the Timesys webbuild, making sure to use sudo to keep root ownership of the files:
sudo tar xzf ~/timesys/premierwave/rfs/rootfs.tar.gz
You will now have the filesystem expanded, and you can make any modifications that you would like to it here. For example, adding files, changing system files, etc.
cd ..
- For all 64 MB flash PremierWave devices (currently all but SE1000 256MB option):
sudo ~/timesys/premierwave/toolchain/bin/mkfs.ubifs -m 512 -e 15872 -c 4096 -r ./fs -o rootfs.ubifs
- For SE1000 256 MB device:
sudo ~/timesys/premierwave/toolchain/bin/mkfs.ubifs -m 2048 -e 129024 -c 4096 ./fs -o rootfs.ubifs
Building filesystem ROM image
Calculating rootfs partition size
You should now inspect the size of the rootfs.ubifs file output to decide how large you would like to make the rootfs partition on the PremierWave device. It should always be larger than the rootfs.ubifs. Be mindful that because of the dual bank system, the flash space used will be twice as much as the value you decide here. The value will be in kB. For 64 MB devices, the maximum value for rootfs partition size is 30721.
Make ROM image
Now use that value to create the .rom image containing the rootfs:
ltrx-makeimage -t10 rootfs.ubifs -v<version number> -i<device id> -pimg<partition size> -ptot0
Where:
- <version number>: Choose a version number
- <partition size>: The calculated number
- <device id>:
- PremierWave SE1000 64MB: P0
- PremierWave SE1000 256MB: P7
- PremierWave EN: P1
- PremierWave XN: P2
- PremierWave XC: P3
- PremierWave XC HSPA+: P6
For example, for PremierWave SE1000 64MB, creating a 28MB rootfs partition:
ltrx-makeimage -t10 rootfs.ubifs -v7.9.0.1R2 -iP0 -pimg28672 -ptot0
Changing the kernel
Source code location and changes
The sources for the kernel will be installed by default at ~/timesys/premierwave/kernel-source/
If you would like to make any modifications to the kernel source, you can edit the files in that tree.
Reconfiguring the kernel
If you need to change configuration, you can use the graphical menuconfig system to do so. Change directory to ~/timesys/premierwave/kernel-source/linux-2.6.xx and type:
make menuconfig
Now make any modifications to the configuration that are necessary.
Rebuild the kernel
Change directory to ~/timesys/premierwave/kernel-source/linux-2.6.xx and execute this command:
make ARCH=arm CROSS_COMPILE=armv5l-timesys-linux-gnueabi- uImage
The new uImage will be in arch/arm/boot/uImage and you can use ltrx-makeimage to make that into a .rom:
ltrx-makeimage -t4 arch/arm/boot/uImage
Now you have your new .rom kernel image that you can use in the ltrx-makeimage -c step where you combine the kernel and the rootfs to create the final image.

