XPicoWiFi/DeveloperGuide
Contents
Overview
The xPico Wi-Fi is a fully integrated Wi-Fi module with TCP/IP stack and Lantronix SmartSuite applications that make deployment of secure, reliable products much easier.
At the heart of the Lantronix SmartSuite is a fully-featured Configuration Manager which saves all module configuration to Flash. This means that once the module is configured, there is no initialization process that is needed to run externally as the module loads the configuration from flash each time it boots.
The software splits the network applications from the applications that run on the serial port, so that they don't depend on each other. For example, the SNTP client can run regardless of what runs on the serial port, so that many different information consumers on the device (web server, serial port, etc) know what the internet time is.
Configuration Manager
Overview
The xPico Wi-Fi includes a fully-featured Configuration Manager which saves configuration to Flash. This means that once the device is configured, there is no init process needed each time it boots, as it loads configuration from flash each time. There are different ways to change configuration when needed:
Accessing configuration
Web browser
The xPico Wi-Fi has a built-in web server that by default serves the configuration manager GUI. The user can log in with their browser and change configuration. This can be accessed either from the SoftAP interface or the Infrastructure interface.
Serial Port
From the serial port: From the Command Line Interface (CLI), you can either send XML, or traverse the menus of the CLI. The menu structure and definition is starting on page 106 of the User Guide.
WebAPI
From the network using WebAPI: With a simple HTTP request, you can change configuration by sending XML-formatted changes. See Chapter 5 of the User Guide.
Connecting xPico Wi-Fi to a microcontroller
The xPico Wi-Fi has four serial interfaces that you can use to connect to your microcontroller:
- 2 UART interfaces
- 1 SPI Master interface
- 1 USB Device full speed interface
The UART interface is the simplest to implement, as it requires no driver or special protocol.
UART interfaces
Hardware
Both UART interfaces (referred as Line 1 and Line 2) can have baud rates up to 921kbps, and only require the TX and RX pins connected to a microcontroller to work. In addition, Line 1 can also use RTS and CTS lines for hardware flow control. Both lines can use XON/XOFF software flow control.
SPI interface
The SPI interface is a Master interface, which can be controlled with the Lantronix SmartSuite Monitor application.
USB interface
The USB interface is a full speed (12 mbps) Device interface. It will be enabled in future firmware.
Serial port communication/protocol
As part of the Lantronix SmartSuite of serial port applications, the xPico Wi-Fi offers multiple applications that can run on the serial ports.
- Tunnel
- Modem Emulation (AT Commands)
- Monitor (scripting engine)
- Mux (serial API)
- Command Line Interface
You can choose a combination of these applications to run on each Line. Which application runs will depend on your microcontroller and the application.
Please see the xPico Wi-Fi User Guide for details on how all of these applications work. The sections below will give you an overview of each application and how they could be used in your application.
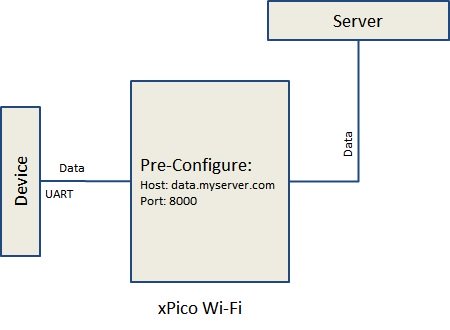
Tunnel
Configure all the connection details before deploying your device.
- Setup the server to send data to or listen for incoming connections
- Data is transparently tunneled to/from the serial port to the TCP port at the other end
- Configurable for:
- Start/End characters
- Automatically reconnect
- Timeout disconnect
- Packing/flushing
- xPico Wi-Fi manages all networking
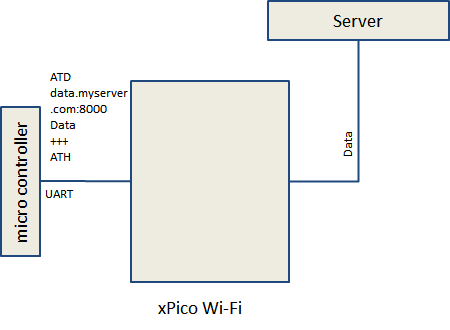
Modem Emulation (AT Commands)
Control the network connection at run-time.
- Easy to use, familiar AT commands
- Device controls where the connection is made
- xPico Wi-Fi manages all networking
- Can also listen for connections with ATA command
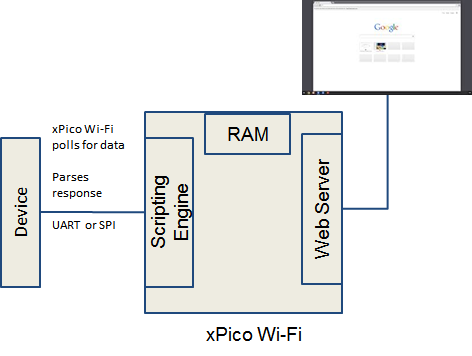
Monitor
Connect directly to sensors, display on local web server
- xPico Wi-Fi will query sensors
- Periodically (poll)
- On request by Web Browser (control)
- Programmable filtering and parsing of returned data
- Filtered data stored in on-module RAM
- Can access data via Javascript/AJAX from browser
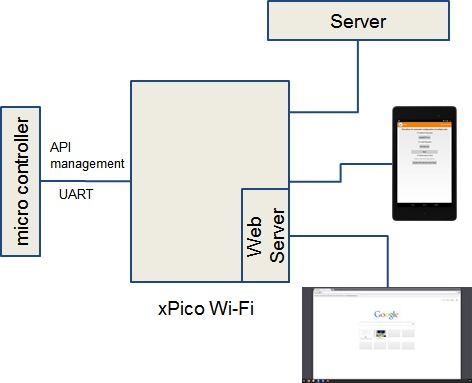
Mux
Manage multiple connections from one serial port
- xPico Wi-Fi still manages all networking, including web server, TCP sockets, etc.
- Microcontroller can switch, with a simple API:
- Sending/receiving data to server
- Listening on a TCP port
- Get data to/from the webserver at a specific URL
- Up to 4 concurrent connections
- Data is streamed directly to/from network connection to serial port, no limits because of RAM space
See the Mux development page for more details and examples on how to use the Mux application.


