XPicoWiFi/ManufacturingConfiguration
Contents
Introduction
Your product will probably have settings on the xPico Wi-Fi that are different from the factory defaults. At a minimum, you will want to change some configuration parameter. If using the built-in Web Server for custom web pages, you will also want to upload the HTML pages to the xPico Wi-Fi's filesystem.
There are multiple ways that this can be achieved. If you have an attached microcontroller, the MCU can configure the xPico Wi-Fi at run-time via the serial port. However, if you want to simplify your MCU's code to just handle data communication and not have to do the one-time configuration of the xPico Wi-Fi, you can configure it at manufacturing.
Using the Soft Access Point
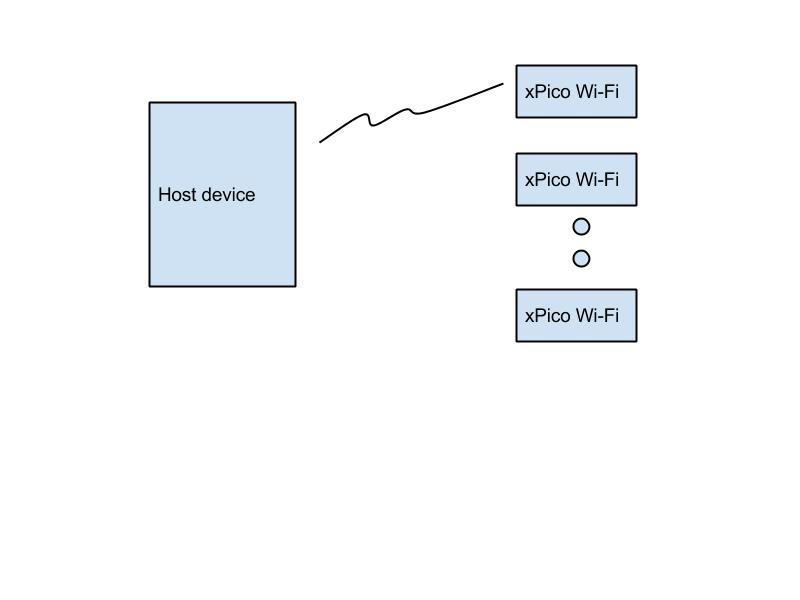
Using this scheme, a Host device on the Manufacturing floor (which can be a Windows PC, or an Android device) is always scanning on Wi-Fi to find the SSID of the default Soft AP of the xPico Wi-Fi. When it finds it, it will connect to the device, and then use the WebAPI to upload configuration and the WebDAV filesystem API to upload filesystem files.
From a Windows host
Create a file named c:\profiles\test.xml with the following contents:
<?xml version="1.0" encoding="US-ASCII"?>
<WLANProfile xmlns="http://www.microsoft.com/networking/WLAN/profile/v1">
    <name>testXPW</name>
    <SSIDConfig>
        <SSID>
            <name>XpicoWiFi_123456</name>
        </SSID>
    </SSIDConfig>
    <connectionType>ESS</connectionType>
    <connectionMode>auto</connectionMode>
    <autoSwitch>false</autoSwitch>
    <MSM>
        <security>
            <authEncryption>
                <authentication>WPA2PSK</authentication>
                <encryption>AES</encryption>
                <useOneX>false</useOneX>
            </authEncryption>
	    <sharedKey>
		<keyType>passPhrase</keyType>
		<protected>false</protected>
		<keyMaterial>XPICOWIFI</keyMaterial>
	    </sharedKey>
        </security>
    </MSM>
</WLANProfile>
Create a batch file that will be run as Administrator. Copy and paste the following code into the batch file:
@echo off
netsh wlan disconnect interface="Wireless Network Connection"
netsh wlan delete profile name=testXPW
netsh wlan add profile filename="c:\profiles\test.xml"
netsh wlan show networks > temp.out
del /F temp1.out
findstr /L XpicoWiFi_ temp.out > temp1.out
for /F "tokens=4" %%i in (temp1.out) do (
                netsh wlan set profileparameter name=testXPW SSIDname=%%i
rem        netsh wlan connect name=testXPW
rem        profile is set to "auto connect" so the above is not needed
                ping -n 10 192.168.0.1 > nul
rem
rem        do the curl configuration here
rem
                curl -u admin:PASSWORD http://192.168.0.1/import/config -X POST --form configrecord=@build.xml
                curl -u admin:PASSWORD http://192.168.0.1/fs/http -X MKCOL
                curl -u admin:PASSWORD http://192.168.0.1/fs/http/ -T test.html
                ping -n 30 192.168.0.1 > nul
                netsh wlan disconnect interface="Wireless Network Connection" >> log
)
@echo on
The pings are used for spending time, since there is no sleep command in the Windows shell.
The batch file does the following:
- Disconnects the wireless interface
- Deletes the profile that we are going to change from the Windows connection manager (just in case it's already in there)
- Adds the profile, which is based on the test.xml file
- Scans the network for available SSIDs
- Filters the scan list for SSIDs that start with 'XpicoWiFi'
- Loop for each SSID of the filtered list:
- Change the SSID of the Windows profile
- Automatically connect
- Attempt to ping for 10 seconds
- Use curl to upload the build.xml file which is your custom configuration
- Use curl to create the http directory
- Use curl to upload your test.html file into the http directory
- Sleep for 30 seconds
- Disconnect
Make sure that in the same directory as the batch file you have a build.xml file with the configuration changes that you would like to see from the default configuration, and also the filesystem files that you would like to upload. Change the curl commands for the filesystem upload as necessary for your files.
Here is the batch file if you want to do both a firmware upgrade as well as configuration:
@echo off
set fwFile1=xPicoWifi_1.1.0.2R10.rom
set fwFile=xPicoWifi_1.3.0.1R4.rom
set hostIP=192.168.0.1
set param1="ajax=SimpleAction&needGroup=1&Group=Device.Firmware Upload;&new.confirms=Upload%%20firmware%%20image"
set param2="group=Device&action=Firmware Upload"
set oldVer="1.1.0.2"
set newVer="1.3.0.1"

del /F log
del /F temp.out
del /F temp1.out

netsh wlan disconnect interface="Wireless Network Connection"
netsh wlan delete profile name=testXPW
netsh wlan add profile filename="c:\profiles\test.xml"
netsh wlan show networks > temp.out
findstr /L XpicoWiFi_ temp.out > temp1.out
for /F "tokens=4" %%i in (temp1.out) do (
rem        echo %%i
                netsh wlan set profileparameter name=testXPW SSIDname=%%i >> log
                netsh wlan connect name=testXPW >> log
rem        profile is set to "auto connect" so the above is not needed
                ping -n 10  %hostIP% >> log
rem
rem        do the new firmware flash & reboots here
rem
rem                        find the version and set param correctly
                del /F temp2.out
                del /F temp3.out
                set param=%param2%
                curl -u admin:PASSWORD -X POST -d "optionalGroupList=Device" http://%hostIP%/export/status > temp2.out
                findstr /L %oldVer% temp2.out > temp3.out
                for /F "delims=>< tokens=3" %%j in (temp3.out) do (
                                echo %%j >> log
                                set param=%param1%
                )
                echo %param% >> log
rem
rem                        kick the device into OTA
rem
                ping -n 3 %hostIP% >> log
                echo "curl -u admin:PASSWORD -X POST -d %param% http://%hostIP%/" >> log
                curl -u admin:PASSWORD -X POST -d %param% http://%hostIP%/
                ping -n 15 %hostIP% >> log
rem
rem                        push the new firmware
rem
                echo "curl -X POST -F datafile=@%fwFile% http://%hostIP%/upgrade" >> log
                curl -X POST -F datafile=@%fwFile% http://%hostIP%/upgrade
                ping -n 5 %hostIP% >> log
rem
rem                        reboot the device
rem
                curl -X POST http://%hostIP%/reboot
                ping -n 10 %hostIP% >> log
rem
                netsh wlan connect name=testXPW >> log
                ping -n 3 %hostIP% >> log
                del /F temp4.out
                del /F temp5.out
                curl -u admin:PASSWORD -X POST -d "optionalGroupList=Device" http://%hostIP%/export/status > temp4.out
                findstr /L %newVer% temp4.out > temp5.out
                for /F "delims=>< tokens=3" %%k in (temp5.out) do (
                                echo "upgraded %%i from %%j to %%k" >> log
                )
rem
rem        do the curl configuration & reboot here
rem
rem        curl -u admin:PASSWORD http://%hostIP%/import/config -X POST --form configrecord=@build.xml
rem        ping -n 60 %hostIP% > nul
                netsh wlan disconnect interface="Wireless Network Connection" >> log
)

@echo on
From an Android host
Prepare your Android device
Install the xPico WiFi Utilities App from the Google Play Store. Using a file explorer program on the device, or your PC if connected via USB, copy the configuration file with either .xcr or .xml extension to the following directory in the Android device:
Android/data/com.lantronix.xpicowifiutils/files/xcrfiles/
Another option is to access a configuration file stored in your Google Drive account. If you would like to do that, make sure to link to your Google Drive account in the first page of the App.
The configuration file should only include the fields that are changed from the default. You can construct the XML file either by looking at the xPico WiFi User Guide, or by configuring a “Golden device” by hand, and then viewing that device’s XML configuration using the WebAPI. For example, to use the Mux on Line 2, you would have the following XML file:
<?xml version="1.0" standalone="yes"?>
<!Automatically
generated XML >
<!DOCTYPE configrecord [
<!ELEMENT configrecord (configgroup+)>
<!ELEMENT configgroup (configitem+)>
<!ELEMENT configitem (value+)>
<!ELEMENT value (#PCDATA)>
<!ATTLIST configrecord version CDATA #IMPLIED>
<!ATTLIST configgroup name CDATA #IMPLIED>
<!ATTLIST configgroup instance CDATA #IMPLIED>
<!ATTLIST configitem name CDATA #IMPLIED>
<!ATTLIST configitem instance CDATA #IMPLIED>
<!ATTLIST value name CDATA #IMPLIED>
]>
<configrecord version = "0.1.0.1">
<configgroup name = "Line" instance = "2">
<configitem name = "Protocol">
<value>Mux</value>
</configitem>
</configgroup>
</configrecord>
Now install a ZIP compressed file, with a .zip extension into this directory:
Android/data/com.lantronix.xpicowifiutils/files/zipfiles/
This file can also be loaded from your Google Drive account.
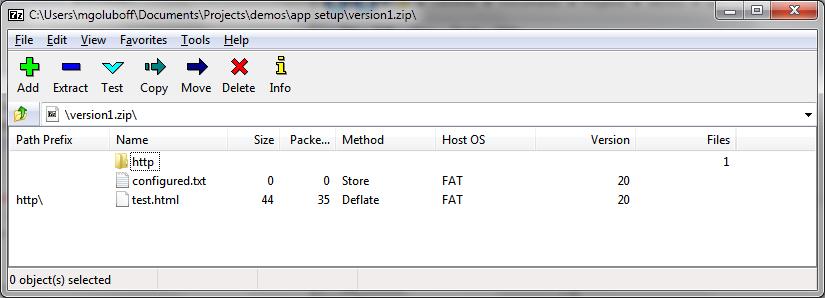
The zip file can contain both files and directories. Manufacturing Mode will create the directories and install the files appropriately. For example, the zip file shown in the picture below will install the file configured.txt in the base directory of the xPico WiFi, then create an http/ directory and install a test.html file there.
Using Manufacturing Mode
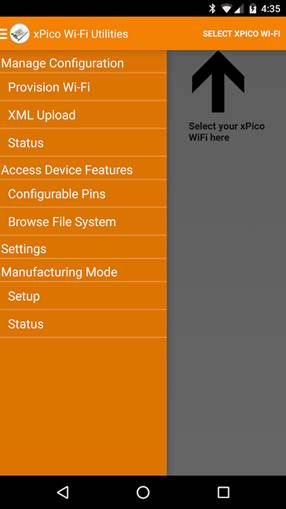
As shown in this picture, Manufacturing Mode has two tabs that you can choose from.
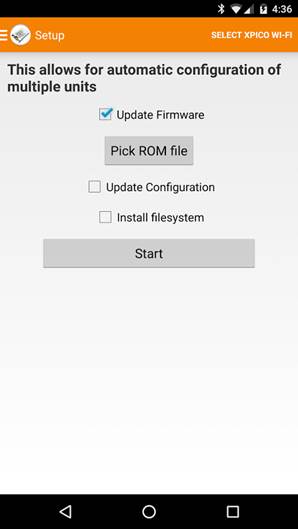
The Setup tab is where you can configure what files to use for the customization, and to start and stop Manufacturing Mode.
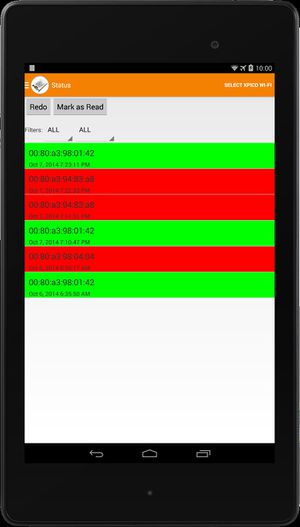
The Status tab shows the results from the database, so that an operator can view which devices have passed or failed.
The Status tab also allows to filter devices and to set certain devices to allow to re-configure. For example, if you’d like to reconfigure the Failed devices after applying a fix.
In the Setup tab, use the checkboxes to select which items you would like to customize on the xPico Wi-Fi. You can select to only customize configure or the filesystem, or select both.
Once you select which ones, you can use the buttons to choose which files to use for each step.
Press the Start button to set the Android device in Manufacturing Mode. Once this Mode is started, it will run in the background, even if you navigate away from the xPico Wi-Fi Utilities App.
Other parts of the Utilities App will not work when Manufacturing Mode is started, as it takes over the Wi-Fi connection functionalities of the Android device.
To stop Manufacturing Mode, come back to this screen and press the Stop button.
In the Status tab, an operator can monitor as the App automatically customizes the xPico Wi-Fi devices that are turned on in the vicinity of the Android device.
The App displays in green for devices that were successfully customized, and in red the devices that were unsuccessful. This way, the operator can enter the PASS/FAIL data into their tracking sytem.
This tab also allows the operator to filter the devices by PASS/FAIL, or by database entries that have already been read.
The buttons at the top will Mark as Read the currently displayed database entries, or allow the currently displayed xPico Wi-Fi devices to be customized again next time they are detected by the Android device.
