XPicoWiFi/Monitor
Contents
Overview
The Monitor feature can be used to query and capture desired information during an xPico Wi-Fi serial port to serial device connection. Through the Monitor feature in Web Manager, you may configure the monitoring of a connected serial device through a sequence of five pages via Explorer, or go to a specific Configuration page to make specific changes. The device monitoring status can be viewed through the Status page.
The documentation for Monitor can be found in the User Guide on Chapter 16. There is an extensive example there on how to communicate with a device that has a command line.
Example: The babbling device
A babbling device is one that sends data periodically over the serial port, regardless of whether another device is attached or not. Usually it is delimited by a newline or a carriage return to indicate new data. This kind of device is stateless, and usually we only care about the last value, rather than all the values in between.
An example is a scale like the Homedics 349klx or certain pulse oximeter devices.
Video of the example
<youtube>L4prVqeYkY4</youtube>
Setting up Monitor
Serial Port setup
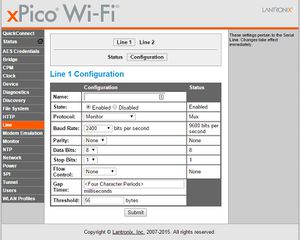
On the configuration for Line 1, set the Baud Rate to 2400 baud and the Protocol to Monitor. Don't forget to click the Submit button to save the configuration!
Monitor
To setup how Monitor will parse the data from the scale, we will use Explorer which makes it very easy to configure Monitor correctly.
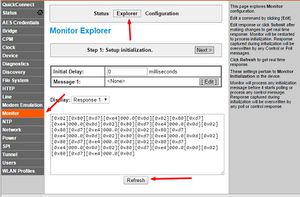
Click on Monitor, then Explorer. With the scale on so that it is sending data, click Refresh to the see the data that is being sent by the scale.
The data shows up in the data display, which shows as:
[0x02][0x80][0xd7][0xe4]000.0[0x0d] [0x02][0x80][0xd7][0xe4]000.0[0x0d] [0x02][0x80][0xd7][0xe4]000.0[0x0d] [0x02][0x80][0xd7][0xe4]000.0[0x0d] [0x02][0x80][0xd7][0xe4]000.0[0x0d] [0x02][0x80][0xd7][0xe4]000.0[0x0d] [0x02][0x80][0xd7][0xe4]000.0[0x0d] [0x02][0x80][0xd7][0xe4]000.0[0x0d] [0x02][0x80][0xd7][0xe4]000.0[0x0d] [0x02][0x80][0xd7][0xe4]000.0[0x0d]
The data is shown highlighted by row sent by the scale. Each row ends in a [0x0d] which is the newline character. Note that the xPico Wi-Fi represents non-printable characters by their hex value, and inside brackets.
If our scale needed initialization data to be sent, here's where we would enter. But it's a babbler, so nothing is needed to get it to talk. Click Next> to move to the next page.
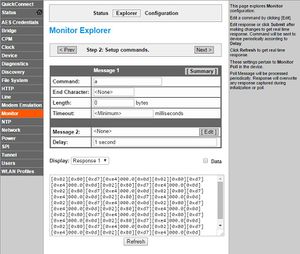
This next page is to setup the command to send on the serial port periodically to gather data. While the scale might not need it, there are devices that require a "read" command. The scale will discard it, so put anything you want in the Command, and set the Delay to 1 second. This way, we will read data from the scale once per second
Click Next>
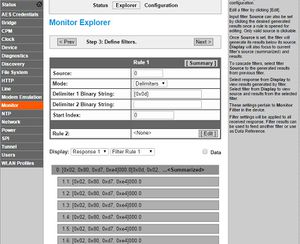
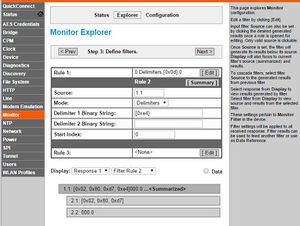
Now we will setup some filters to extract the weight data that we want. As we saw earlier, the data comes in "rows" that are separated by newline characters. So expand the Rule 1 to setup a filter rule. Click on the data as the Source (or set the Source as 0), set Mode to Delimiter, and the string to [0x0d]. This will separate all the lines on their own. You can see the output of filter 1 below, at 1.1, 1.2, 1.3, etc.
While we could stop here and put a whole line into RAM, then let the Javascript on the reading App worry about splitting it up, we'll setup a second filter to just gather the weight data.
Click Edit on Rule 2. For Source, you can click on the first line that was split from Filter 1 (or enter 1.1). Again we choose Delimiters as the Mode. The Delimiter this time is [0xe4] as that's always the value before the weight.
You can see that each line is now split into two. 2.1 is the value before the [0xe4] and 2.2 is the value after, which is the weight string.
Click Next to go to Step 4.
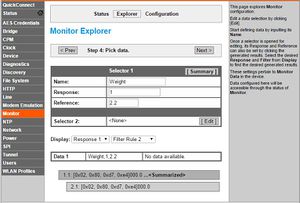
In step 4, we pick the data that we want and assign it a name to be easily retrieved by the WebAPI from RAM. Here we will click on the item showing just the value (000.0) which will be selector 2.2. Assign it the name Weight, and click Next.
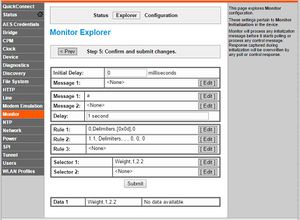
Step 5 will show the configuration that will be saved into Monitor to confirm that this is the configuration you would like. Click Submit to save the configuration.
Viewing your data
Monitor will read the data from the scale once per second, and extract the weight per the configuration above. That data is then stored in RAM and can be retrieved via a Status Action call with the WebAPI. For more details on how this works, review the WebAPI documentation in the User Guide.
Since the WebAPI is accessible via a standard HTTP request, you can use Javascript to dynamically update the weight display in the browser.
<!DOCTYPE html>
<body>
<h1>
Weight:
<div id="userData"></div>
</h1>
<script>
	var xmlhttp = new XMLHttpRequest();
	var timeout;

	var userData = "Weight";     // Set this to the same as the Name given to the Data value in Monitor config

	// Define a callback for when the HTTP transaction is done
	xmlhttp.onreadystatechange=function() {
		if (xmlhttp.readyState==4 && xmlhttp.status==200) {
			var xmlDoc=xmlhttp.responseXML;

			// Find all the nodes with statusitem as the name. First will be the actual status
			// of monitor, and after that will be the different names that have been defined
			var items = xmlDoc.getElementsByTagName("statusitem");

			// Iterate over the statusitem nodes until we find the one that we want to update
			// the HTML page with
			for(i=0;i<items.length;i++)
			{
				if(items[i].getAttribute('name') == "Data" && items[i].getAttribute('instance') == userData)
				{
					if(items[i].getElementsByTagName("value")[0].childNodes.length > 0)
					{
						document.getElementById("userData").innerHTML = items[i].getElementsByTagName("value")[0].childNodes[0].nodeValue;
					}
				}
			}

			// Call the function to update data again in 1 second
			clearTimeout(timeout);
			timeout = setTimeout(function(){updateData();}, 1000);
		}
	};

	function updateData() {
		xmlhttp.open("POST","/export/status", true);
		xmlhttp.setRequestHeader("Content-Type", "application/x-www-form-urlencoded");
		xmlhttp.send("optionalGroupList=Monitor");
	}

	window.onload = function(){ updateData(); };

</script>
</body>
</html>
Copy the code above into an html file (for example, weight.html). Then use the xPico Wi-Fi's web manager and go into the Filesystem tab. Create a directory called http, change into that directory, and upload the weight.html file.
The file will now be served by the xPico Wi-Fi's web server at: http://<<ip address of xPico Wi-Fi>>/weight.html
